Is it all worth it? I mean really?
In order to convince myself that it’s worth all the hassle and cost of making my solar panels self-adjusting, I thought that it would be a rather good idea to see what difference there would be in power output by changing the angle of the panels in a real life situation.
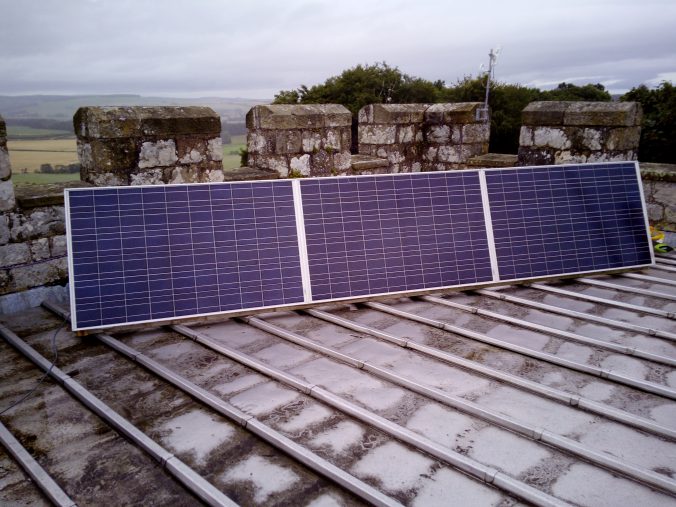
So, despite the almost constant rain here in Northumberland this “summer“, I managed to find a vaguely dry day on which to set up a bank of three panels on the flat roof of our Pele tower. This roof is covered with zinc sheeting and is like an ice skating rink when it gets even slightly damp. As there’s been more-or-less a lake up there for the last couple of months, I’ve avoided going up there like the plague in order avoid killing myself. However, there are now finally three panels in place. Fortunately, getting up there is reasonably easy even though it’s up a 1000 year old, medieval spiral staircase and the panels only just sqeeeeezed through. Clearly, they were planning more for defense against armed marauders than manhandling large aluminium and glass panels up on high. Who would have thought it?
On The Roof
I constructed a light, wooden frame to hold the panels and attached the linear actuator and a pair of 400 newton (40 Kg) gas lift struts. The first time I attempted to adjust the panels using the linear actuator, it became immediately apparent that the struts lifting capability was way too much as the panels started to warp as the actuator and struts fought against each other. So, on to Plan B when we get a break in the weather.
This consists of fitting four smaller, 100N (10Kg)struts, spaced equally along the array to give an even lifting assistance to the actuator. I figure that four struts will also help greatly in stabilising things if it gets a bit windy. I also fitted a small length of 50mm x 50mm, 3mm thick steel angle iron to the junctions between the panels to give them more rigidity and to reduce any potential bending or warping of the panel frames. One additional advantage of the smaller gas struts is price. The larger ones are about £18 per pair, whereas the small ones are £1 each, even though I’ll probably need to use all four, that’s quite a saving when I’m putting up 18 solar arrays.
To do my tests regarding adjusting the panels throughout the day to track the elevation of the sun, I need a totally cloud free day. Hey, it’s August in England, you’d expect a bit of sun occasionally wouldn’t you? Well, you’d be wrong! So far, I haven’t been able to carry out any tests whatsoever, other than putting what meagre amount of power is penetrating the clouds into my batteries. Who wrote that autumn is the season of mists and mellow fruitfulness? Well, we’ve had the strawberries, the red currants, the black currants, the gooseberries and the plums, so lots of mellow fruitfulness there. We’ve had/are having the mists and the rain, so is summer in the UK actually now autumn?
Solar Power and Voltage Output
Power, At Last!
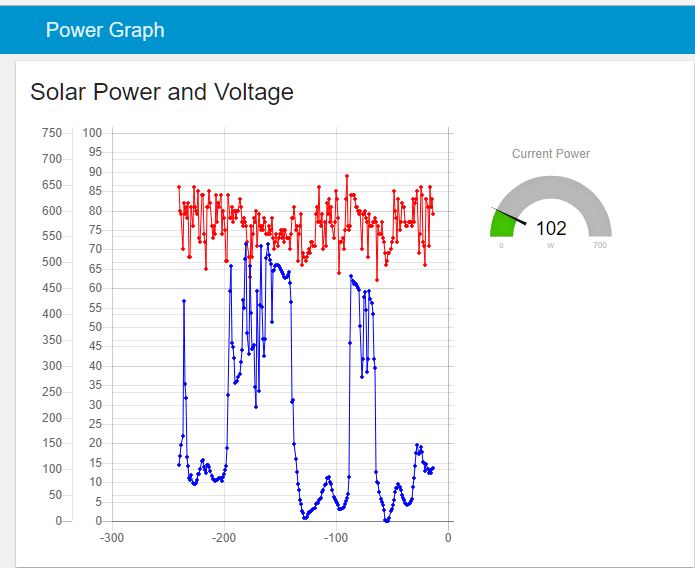
The graph on the right shows the power from the panels for the last four hours. The blue graph is the electrical power being generated and the red one is the DC voltage of the array. I find it interesting that the MPPT solar battery charger inside the PIP4048 inverter/chargers only takes just as much power as the panels will give, so the voltage stays within a reasonably constant range.
There keep on being brief periods when the sun peeps out from behind the clouds, just to see if we’re wet enough down here. A couple of hours ago, for one gloriously brief moment, I was getting 536 lovely watts surging down the wires from the roof into my circuit cellar. In theory, in decent sunlight, I should achieve up to 745W, but so far no joy, no way.
My aim (dream!) is to have at least one totally, gin clear day so that I can log the power generated at different angles of the panel. Clearly, when they are face on to the sun, that should be the maximum power point. I have incorporated the ability in my little solar panel tracking units to be able to over-ride the automatic tracking facility and just force the panels to any desired angle.
Deluded?
This will mean that I can assess the different angles that people use for their boringly, fixed arrays and see how much extra juice they’d have to play with if they were to install trackers. Well, that’s the theory anyway and until we get some proper sunshine, that’s where it it’ll stay – in the land of untested theory.
Updates
I’ll update this post when or if the weather improves and I can get out onto the roof without risking life and limb, hopefully with some pictures of the final setup with the new gas struts.
Update – Sunday Afternoon
We had a brief gap in the rain, so I managed to get a couple of outside jobs done and then got up onto the roof for an hour or so before the heavens opened once more.
Here is the result of connecting three 24 volt panels end to end, giving me in reality between 70 and 90 volts depending upon the sun or lack thereof (more likely at the moment). I’ve bolted the frames together and then put some 50mm x 50mm steel angle iron along the tops to stiffen the whole thing.

A 3-way solar array
You can see that I’ve mounted them in sort of landscape format rather than the usual portrait layout you often see in solar farms in the countryside. The reason for this is that those panels you see dotted around in fields are on fixed frames, so they are stiffened at both ends making them more stable. I only want to use one linear actuator mounted in the middle of the central panel rather than one at either end, just in case one of them failed, I don’t want the array to be warped by the still functioning actuator and the panels potentially cracked.
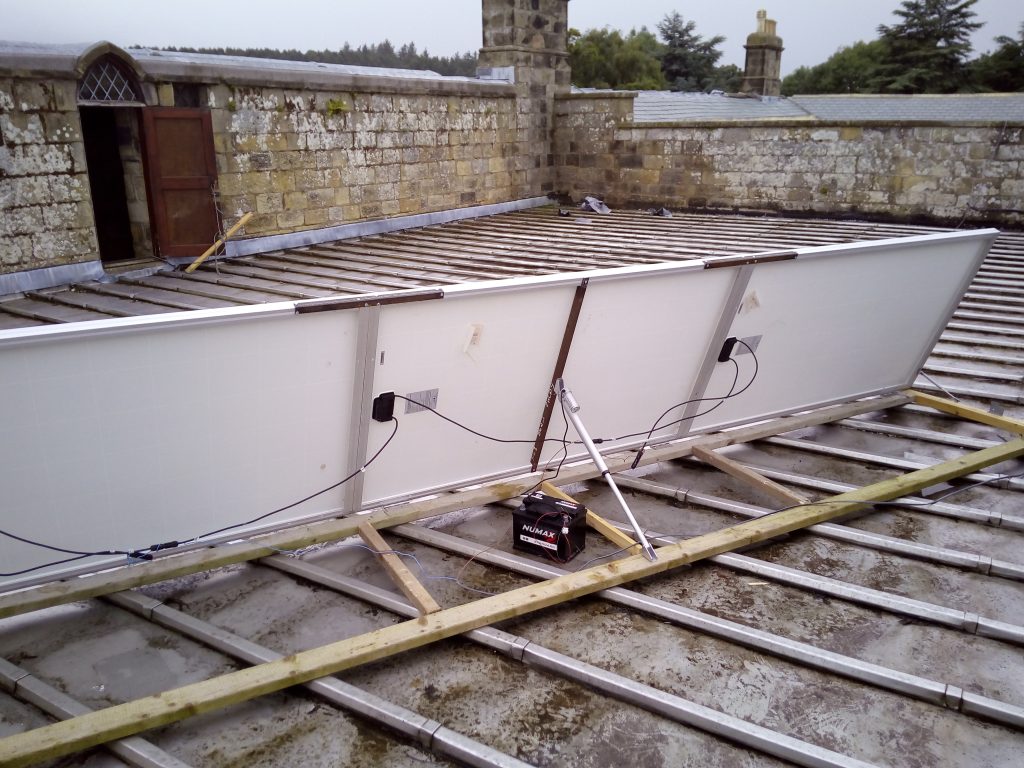
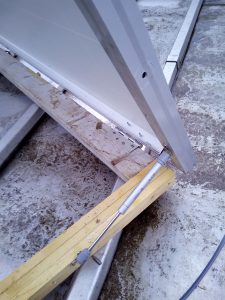
Back of the Solar Array
Below you can see the back of the array. There’s a stiffener (steel angle iron) which I’ve mounted in the centre of the middle panel to allow me ato attach the linear actuator. This at least means that the forces across the array are fairly constant and therefore less likely to crack the panels as they are being adjusted.
You can see the small 12V battery that I’ve using to run the actuator whilst setting everything up – it allows me to extend and retract the actuator to check that everything is working. Once I’m happy with the design, I’ll throw a cable down int the light well which is to the right of the picture over the wall and down into my workshop where all the magic is happening.
Here’s a closeup of the actuator – you can see that the way that I’ve mounted it makes it look like it’s upside down.
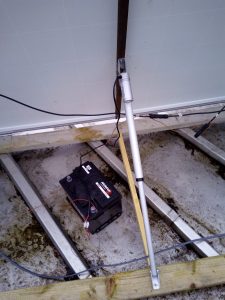
The Linear Actuator
In fact, having the motor at the top and the piston pushing down helps to reduce the potential for dirt or water getting past the seal. There’s also a lubricating mechanism inside which only works when it’s this way up.
I’m considering putting some kind of water proof fabric shield over the whole of the back of the panels to protect cables, actuator and gas struts from the dust and weather, however putting the actuators and the struts the right way up is a good start anyway.
Gas Strut Installed
I installed two of the 100N gas struts – you can see one of them at the end of the panels above – but, I don’t think that they’re quite meaty enough for the job as I had to mount them at quite a shallow angle so that their limited travel wasn’t a problem as the array moves. Never mind, I’ve got four 200N versions winging their way from Hong Kong as I type. So, four of these little beauties should in theory give me about 80KG lifting capability which is more than the array which weighs in at 60KG. However, due to the position and angle that I’ve placed them, I’d be surprised if I get more than about 20KG lift which is just enough to stabilise everything in strong winds and to reduce the load on the actuator.
Solar Farm
Things are getting very exciting now as we have the final plans for the house and we’ve been to see the local major to get his opinion, which was very favourable thankfully. Amongst other things, we’ve agreed the location of the solar farm with Fernando the builder who is going to build the garage, the battery/inverter shed and put in the concrete bases for the panels.

The Solar Farm In Spain
You can see from the diagram on the right that the solar farm will be about 200m from the house. The cables from the panels will all go into a shed which will house the batteries,the charger/inverters, my monitoring and control electronics and a backup generator just in case of really bad weather in the winter.
Update on the first “sunny” day for months
All I needed was a bit of consistent weather for my comparative solar tests and I’ve been waiting weeks to get it. Well, finally today was the day! I’ve had a window of opportunity lasting for over two hours now where the sun was shining. Well, I say “shining”, but there is a lot of high level cirrus cloud probably indicating an approaching weather front, so it’ll probably rain again tomorrow, or it may be sunny. Who knows?
Anyway, the point is that it was at least consistent and whilst I didn’t get as much power as the panels are capable of producing, I could see what difference angling them to the sun made to their output.
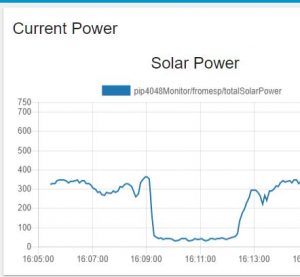
Solar Power Graph
As you can see from the power graph here, at around 16:05, there was around 360W being produced and the tracking unit had set the panels fully face on to the sun. I then adjusted them about 30 degrees away from optimum and the power dipped by around 90-100W just after 16:07. I then brough the panels back through the optimum position and up to the maximum angle of around 80 degrees, in other words almost vertical and the power output plummetted to around 50W!
I wasn’t expecting that much of a drop, I have to say. I then let the panels be set back to the optimum angle by the tracking unit and the output went back up to just short of 400W.
So, it looks as if tracking the suns elevation is definitely worth while as it can make a huge difference to the power output.
This is exactly what I wanted to find out, so the question has been answered, it does look as if it’s worth while adjusting the panel angles throughout the day and throughout the seasons.
Happy days.
Leave a Reply
You must be logged in to post a comment.