How do you turn a light on? Simple, of course, you flick a switch. What if you have lots of separate lights to turn on or off, well you walk around the house flicking lots of switches, surely?
You could go to the main circuit breaker and just switch all of the lighting breakers, but that’s a bit extreme. So, at the risk of re-inventing the wheel, I decided that the offgrid casa needed something new. How about networked lighting control?
I looked at existing houses and it’s unlikely that any one room needs more than three lighting circuits – say, overhead light, wall lights and maybe low level for mood lighting.
So, I turned to the trusy ESP8266 wifi processor that’s the basis of many of my projects and came up with a neat little design to handle three lighting circuits. Using a network linked device means that remote control becomes a possiblity.
Budding electricians amongst you know that in traditional lighting circuits, you can only have two switches on any one circuit as it becomes far more complicated to handle more than two. So, you end up with a switch on the wall as you walk in one door to a room and the second as you go out of another door.
What if you have three doors or want another switch at a more convenient location? Well, there are systems which allow you to have multiple switches using changeover relays – more commonly used in stairwells in apartment buildings. We press once for on and again for off. This is the system that I decided to use.
Three Way Lighting Controller
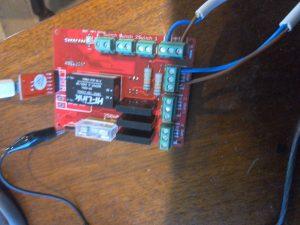
However, instead of a relay, the ESP8266 wifi processor has three inputs and three optically switched outputs, if you look at the picture above, you can see them at the top of the circuit board. There’s an input for the 240V mains and then three switched mains output on the right.
I decided to use opto-isolated triacs to switch the mains to the lights as they’re easy to use and safe. There are two versions – one which switches the mains at the point the AC signal hits zero (zero-crossing) and one that you can switch at any point in the AC cycle. Well, it just so happened that parts I had lying around my workshop were the zero-crossing type. These are great if you want to switch loads without inducing electrical noise in other devices, but if you want to dim lights they are as much use as a chocolate fireguard. Hence, a quick order to Mouser Electronics to fix what I initially thought was a software problem…many wasted hours in front of the keyboard!
So, the opto-switch that I ended up with is the Omron G3MC-202PL which is not expensive and is very neat.
At the time of writing, the board has the abililty to switch the three light output on and off and to set the brightness level. I can also send commands from my RaspberryPi using MQTT messages to change the intensity levels of all outputs. A short press on a spring loaded light switch changes from on to off, a long press cycles the brightness up and then down again. As soon as you release the switch the brightness level is remembered and then that is the ON level until you change it again.
Currently, we’re in Spain going through meetings with our architect, Manel, and our aperjador (structural engineer) Alfonso, so I haven’t been able to complete the software. However, an inspiration as I lay in the sun the other day was to allow the units to be linked together without a server so that they can work in a standalone situation.
This would be handy so that I could use one unit with as a master switch, say, near the front door of the house to turn all the lights off or restore them to their previous state which will be really useful if we’re going out for dinner.
So, each unit will have a list of other units that it can switch. Of course, these could be anywhere in the house or I guess potentially anywhere in the world it was felt that was useful!
I’ll add to this post as I get more of the software finished and also upload a video of the switches operating.
Leave a Reply
You must be logged in to post a comment.